Wednesday, December 06, 2023

SpringBootApplication Simple Unit Test

This is an example of how to call SpringBootApplication "Application.main" in a Java unit test.

You should have setup a Spring Boot application already.

Here is an example of a simple Application class.

@SpringBootApplication(scanBasePackages = {"com.company.stuff"})
public class Application
{

    private static ConfigurableApplicationContext configurableApplicationContext = null;

    public static void main(String[] args)
    {
        configurableApplicationContext = SpringApplication.run(Application.class, args);
    }

    public static void shutdown()
    {
        if(null != configurableApplicationContext) {
            SpringApplication.exit(configurableApplicationContext);
        }
    }

}


Here is an example of a unit test that starts the application on a specified port, makes a call to the application via a RestTemplate, and then shuts down the application.


public class ApplicationMainTest
{
    RestTemplate restTemplate = new RestTemplate();

    @Test
    public void testMain() throws Exception {

        try {
            Application.main(new String[]{"--server.port=8093"});

            String url = "http://localHost:8093";
            ResponseEntity<String> response = restTemplate.getForEntity(url, String.class);
            assertNotNull(response);

        }
        catch (Exception ignored) {
            //ignored
        }
        finally {
            Thread.sleep(10000);
            Application.shutdown();
        }
    }
}

Saturday, May 06, 2023

SwiftUI Challenge Edutainment Multiplication Game

 This is going to show the development of my solution to the Edutainment challenge.


First I used a VStack and HStack to create a table layout.


Based on position I began to change the attributes of the Text.


If an entry in the table is "masked" I change the output.


Then I changed the Text entries in the table to be Buttons and added a background image.


For now every time the "Mask" button is pressed I randomly mask out a value. I change the mask from "*" to "??" and change the color and size on the masked value.


When you tap a masked entry a question is displayed in an alert.


If you enter the correct value another alert acknowledges and the mask is taken off the entry in the table.


5 x 2 is no longer masked because of the correct answer.


To get this to work I had to learn how to use an ObservableObject.

The next thing was to select the multipliers. This is done by tapping a row or column header.
This allows the user to select what they want to practice. Here the user has selected column "3" and row "10". The values are masked for 3 and 10 for both the rows and the columns. This is because 3 x 5 is the same as 5 x 3.


Next I begin the View that will allow the user to play the game.


Next I created a new UIView and used @Binding to share the needed data. For now I just rough out the random generation of questions.

The way it works is that the user taps a row or column header. The row or column header is currently blue when selected. Then a set of random questions are generated. I put them in a list for now. I am not sure how the UI will end up.


After running into bugs where all the Buttons in a Form view perform their action when any button is selected and the annoyance that an array in an Observable object doesn't update I have finally got to my final solution.


Changing buttons and such...


Getting an array of responses by using an Observable Object.


Changing the colors.


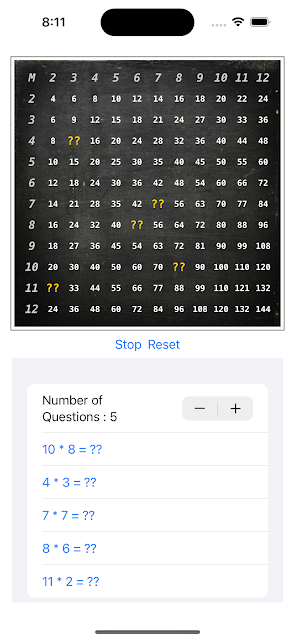
Click a row or column label to select which number you want to practice.
Click Play and it will mask out the answers for how many questions you want.


Click a masked entry and the app prompts you.


The app keeps a list of your answers. If your answer is incorrect the value remains masked in the multiplication table.


I probably over did the assignment but I wanted to dig deeper.


Wednesday, May 03, 2023

Java JDK on Mac

 These are my notes on how I setup a Java JDK on my mac.

Currently I have several JDK's installed.
To see the installations go to:
/usr/libexec

Run:
./java_home -V
Matching Java Virtual Machines (5):
    17.0.1 (x86_64) "Homebrew" - "OpenJDK 17.0.1" /usr/local/Cellar/openjdk/17.0.1/libexec/openjdk.jdk/Contents/Home
    17.0.1 (x86_64) "Amazon.com Inc." - "Amazon Corretto 17" /Library/Java/JavaVirtualMachines/amazon-corretto-17.jdk/Contents/Home
    11.0.19 (x86_64) "Amazon.com Inc." - "Amazon Corretto 11" /Library/Java/JavaVirtualMachines/amazon-corretto-11.jdk/Contents/Home
    1.8.0_322 (x86_64) "Amazon" - "Amazon Corretto 8" /Library/Java/JavaVirtualMachines/amazon-corretto-8.jdk/Contents/Home

I use a symbolic link in /usr/local/opt to point to the java I want to use.
I make the symbolic link as follows:

ln -sfn /Library/Java/JavaVirtualMachines/amazon-corretto-11.jdk/Contents/Home currentjdk
Now the symbolic link "currentjdk" points to the JDK that I want.
Next I edit /etc/profile

# System-wide .profile for sh(1)

if [ -x /usr/libexec/path_helper ]; then
        eval `/usr/libexec/path_helper -s`
fi

if [ "${BASH-no}" != "no" ]; then
        [ -r /etc/bashrc ] && . /etc/bashrc
fi


export JAVA_HOME="/usr/local/opt/currentjdk"

export PATH=$JAVA_HOME/bin:$PATH

After you edit the profile you can create a new terminal and see the current version of java:

$java -version
openjdk version "11.0.19" 2023-04-18 LTS
OpenJDK Runtime Environment Corretto-11.0.19.7.1 (build 11.0.19+7-LTS)
OpenJDK 64-Bit Server VM Corretto-11.0.19.7.1 (build 11.0.19+7-LTS, mixed mode)

Wednesday, April 19, 2023

Swift Functions as Parameters and Trailing Closure

Place the following code in an XCode Play Ground:


import UIKit


struct Person {

    let birthYear : Int

    let name : String

    let tag : String

}


//The build function allows a builder function to be passed in. That function

//can create a new person based on the paramaters passed in

extension Person {

    static func build(birthYear: Int, name: String, tag: String, builder: (_ birthYear: Int, _ name : String, _ tag: String) -> Person) -> Person {


        return builder(birthYear, name, tag)

    }

}


//Functions can have argument labels and parameter names


//Argument labels and Parameter names

func personBuilderOne(theBirthYear birthYear: Int, theName name: String, theTag tag: String) -> Person {

    return Person(birthYear: birthYear, name: name, tag: tag + " Builder One")

}


//No Argument labels, just parameter names

func personBuilderTwo(birthYear: Int, name: String, tag: String) -> Person {

    return Person(birthYear: birthYear, name: name, tag: tag + " Builder Two")

}


//Parameter names are not needed when calling

func personBuilderThree(_ birthYear: Int, _ name: String, _ tag: String) -> Person {

    return Person(birthYear: birthYear, name: name, tag: tag + " Builder Three")

}


//----------------------------------------------------------

//Notice how the signature changes for the function paramter

var person = Person.build(birthYear: 1900, name: "John", tag: "tag", builder: personBuilderOne(theBirthYear:theName:theTag:))

print(person)


person = Person.build(birthYear: 1900, name: "John", tag: "tag", builder: personBuilderTwo(birthYear:name:tag:))

print(person)


person = Person.build(birthYear: 1900, name: "John", tag: "tag", builder: personBuilderThree(_:_:_:))

print(person)

//----------------------------------------------------------


//The builder can be done by using a closure

//The closure params are contrived just to show how they are used

person = Person.build(birthYear: 1910, name: "Mary", tag: "tag") { bYear, theName, theTag in

    return Person(birthYear: bYear, name: theName, tag: theTag + " Closure")

}

print(person)


The output:

Person(birthYear: 1900, name: "John", tag: "tag Builder One")

Person(birthYear: 1900, name: "John", tag: "tag Builder Two")

Person(birthYear: 1900, name: "John", tag: "tag Builder Three")

Person(birthYear: 1910, name: "Mary", tag: "tag Closure")

Monday, January 02, 2023

UILabel UITextField UIStackView Horizontal

Introduction


This is "one" approach of using a horizontal StackView to have a label next to a text input field that keeps the space between the label and the text field during device rotation and on different screen sizes.

This approach does not use custom values for "Content Hugging Priority" or "Content Compression Resistance Priority".

There is one custom class that is needed. I called it UIViewExtended. You can call it anything you like.


//

//  UIViewExtended.swift

//  UITests

//

//  Created by Geoffrey Slinker on 12/24/22.

//


import Foundation

import UIKit


class UIViewExtended : UIView {


    enum Keys: String {

      case proportionalSize = "ProportionalSize"

    }


    var proportionalSize : CGSize


    override init(frame: CGRect) {

        proportionalSize = CGSize(width:1.0, height:1.0)

        super.init(frame:frame)

    }


    required init?(coder aDecoder: NSCoder) {

        let tempSize : CGSize? = aDecoder.decodeCGSize(forKey: Keys.proportionalSize.rawValue)

        if tempSize != nil  && ( tempSize?.width != 0 && tempSize?.height != 0 ) {

            proportionalSize = tempSize!

        }

        else {

            proportionalSize = CGSize(width:1.0, height:1.0)

        }

        super.init(coder: aDecoder)

    }


    override func encode(with coder: NSCoder) {

        coder.encode(self.proportionalSize, forKey: Keys.proportionalSize.rawValue)

        super.encode(with: coder)

    }


    @IBInspectable var intrinsicSize: CGSize {

        get {

            return proportionalSize

        }

        set {

            proportionalSize = newValue

        }

    }


    override open var intrinsicContentSize : CGSize {

        get {

            return proportionalSize

        }

    }


}


The approach is to use UIViews to contain the label and text views. I call this the nested view approach.

Here is the entire layout.


Steps

I

Using XCode create an iOS app with a single view. Add a ContainerView. Inside the Container View (image above - center panel - the Container View is on the right). Inside the Container View add a UIStackView Vertical.


Configure the UIStackView's alignment to be "fill" and distribution to be "fill".


Configure the UIStackView to fill the Container View. Set the constraints as shown above.

II

Add three UIViews to the UIStackView. The top two views will hold other views and the bottom view is used to control spacing.


Take notice of the constraints for these three views. The top two views have a height constraint of 40.

I set the background color of each view to something different so that I can see their locations and boundaries more easily.

III

In the top two views add to each a UIStackView that is horizontal.


Set alignment to "Fill" and distribution to "Fill Proportionally".


Constrain the UIStackViews to fill the UIView in which they are contained.


IV


Now that you have two UIStackViews you can add views that will eventually contain the UILabel and the UITextField.

Add two UIViews to the top horizontal UIStackView. Change their type to UIViewExtended. UIViewExtended will allow you to set the proportions for the view so that it fills the UIStackView in a definable manner.


For the left UIViewExtended set the constraints as shown below.


Also, for the left UIViewExtended set the extended attributes for the intrinsic size (4,0) :


Interface Builder can show you the intrinsic size and how it affects its placement in a UIStackView that is proportionally distributed by setting Intrinsic Size to "PlaceHolder" and enter the exact same value you used for the UIViewExtended "Intrinsic Size".


The place holder is a hint for Interface Builder to render the view using an intrinsic size inside of Interface Builder, it does not set the value for runtime. The runtime value is set because of UIViewExtended.

Now setup the right UIViewExtended.


Set the UIViewExtended intrinsic value as shown above (2, 0). Also setup the constraints and the "PlaceHolder" values as shown below:


Notice that the label is right justified. In the second UIStackView the label will be left justified so that you can see how each works.

Add a UILabel to the left UIViewExtended.


Set the constraints for the UILabel as follows:


Add a UITextField to the UIViewExtended.


Set the UITextField constraints as shown below.


V

Add two UIViews to the second horizontal UIStackView. Change their type to UIViewExtended. UIViewExtended will allow you to set the proportions for the view so that it fills the UIStackView in a definable manner.


For the left UIViewExtended set the Intrinsic size as show above (2,0). Set the constraints for the left UIExtendedView as shown below.


Remember to set the Intrinsic Size "PlaceHolder" as shown above so the InterfaceBuilder will render the view correctly.

Set up the right UIViewExtended as follows.


In the left UIViewExtended ad a UILabel and set it up as follows.


In the right UIViewExtended add a UITextField and set it up as follows.


VI


Now run the "app". Select any iPhone to run, I have started with a smaller device.


Now rotate the device and notice the placements.


Now choose a larger iOS device. I chose iPhone 14 Pro Max.


Now rotate the device.


Conclusion

By using the above approach you can use UIStackViews with proportional distribution and control the placement of a label in relation to a text field. Always there are many ways to solve problems, this is just one way.

Tweak the values until you get a feel for how it all works together.

I wrote this so that I can remember this pattern. My day job is so intense right now that I don't get to work on my iOS apps very often and I forget how I set things up. 

My day job is Java using Apache Solr and Spring Boot apps running in AWS land.