Introduction to Solr 5 SolrCloud
Collection - a complete logical index.
Collections are made up of one or more shards and a replication factor.
Shards have one or more replicas as defined by the replication factor.
Each replica is a core.
Special Note
The term “replica” in SolrCloud has caused me confusion. This paper attempts to clarify this issue.
Here are my words trying to clarify the above terms:
Collection - a complete logical index.
Collections are made up of one or more shards and a replication factor.
There is always at least one instance of a Shard (this is a replication factor of one). There can be more than one instance of a Shard for redundancy ( a replication factor greater than one).
An instance of a shard is called a core.
Collection
A SolrCloud Collection is a complete logical index.
A Collection can be divided into shards. This allows the data to be distributed.

The above picture represents a Collection with one shard and a replication factor of one. This results into a collection with one shard and that one shard IS the one replica. Here in lies the confusion when trying to describe SolrCloud. When I read the word replica I immediately imagine an original and a copy, an original and a replica.
Since there is always at least one replica it can be confusing terminology. When I first started trying to build a mental picture of SolrCloud I erroneously started with the idea that there was a master with replicas and therefore a replication factor of one would be a master and a replica. But that is not the case. What I thought of as a master is in reality “replica one”. Therefore, if you want your original index with one backup / failover copy what you need to say is “I want a replication factor of two.”
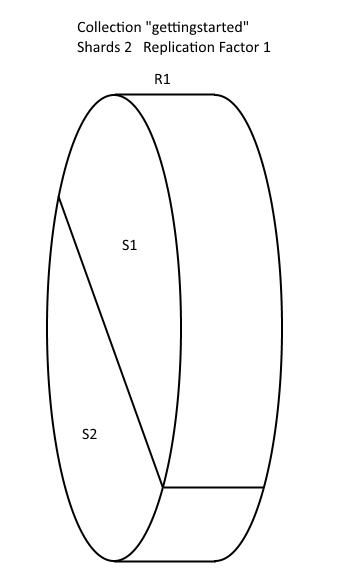
Therefore I feel the best way to describe it is like this:
The above picture represents a Collection with one shard and a replication factor of one. This results into a collection with one shard and that one shard is the only copy / instance of the data. Each instance of a shard is called a Core..
Shard
A Shard is a division of a Collection (complete logical index). Therefore a Shard is a portion or slice of a Collection (complete logical index).
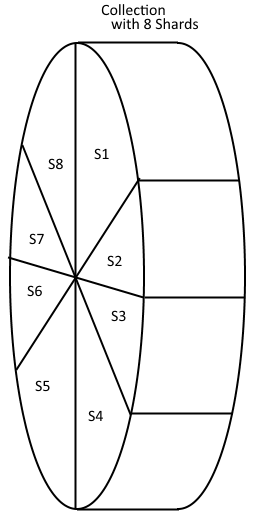
Above represents a Collection sliced or divided into eight Shards.
Why would you want more than one shard? One reason would be if the total size of the collection is too large to fit on one computer.
In a Collection with one Shard all of the data will be in that single shard. For example, if you are doing a dictionary then with one shard the words from A to Z all go into the single shard. If you have two shards then the data for shard one could be A to M and the data for shard two could be N to Z.
Replica
Shards can be duplicated by using a replication factor. The replication factor specifies how many instances of each shard should exist. Each instance of a shard is called a Core. The confusion lies in that a Core is also called a Replica.
From the Solr documentation:
“Collections can be divided into shards. Each shard can exist in multiple copies; these copies of the same shard are called replicas. One of the replicas within a shard is the leader, designated by a leader-election process. Each replica is a physical index, so one replica corresponds to one core.”
The replication factor multiplied by the number of shards results in the total number instances of shards or better said the replication factor multiplied by the number of shards results in the total number of cores.
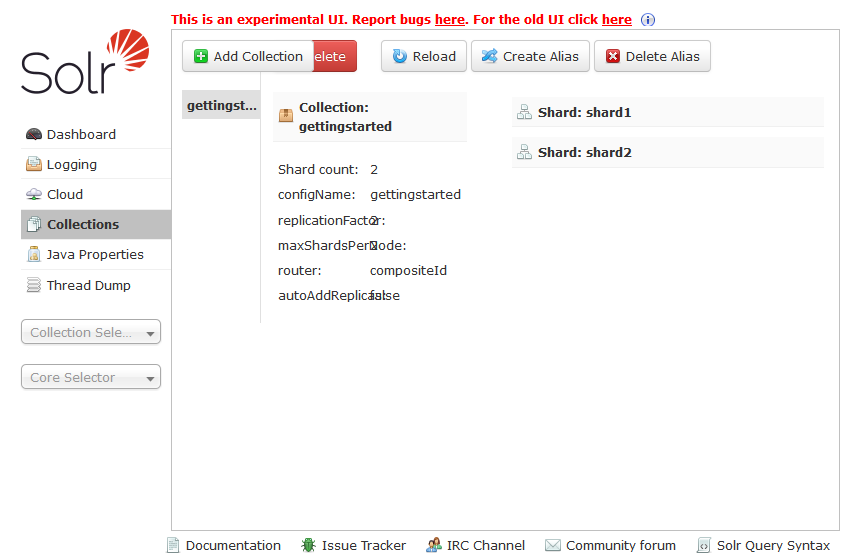
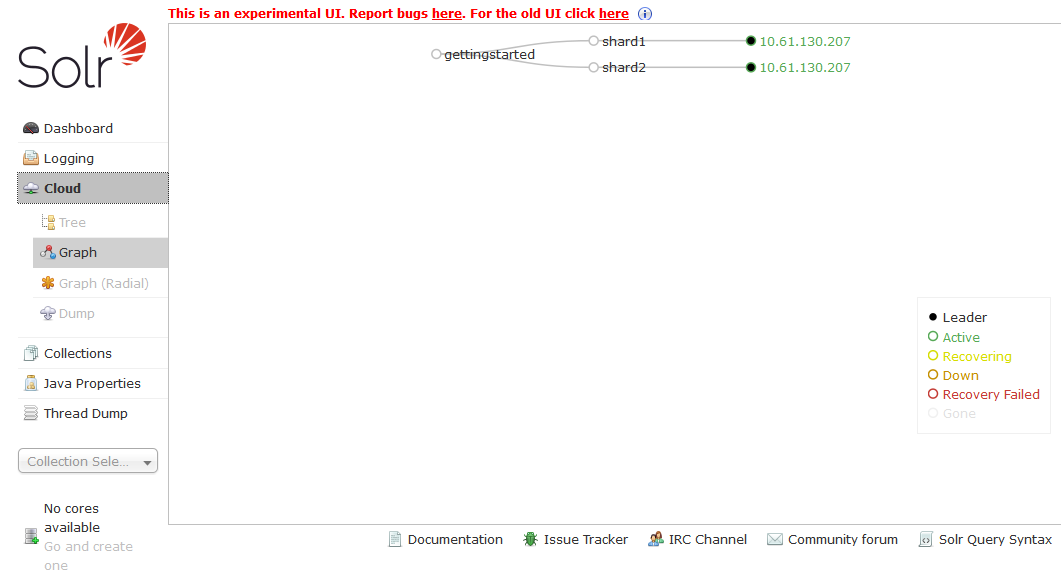
Shard instances show up in the Solr dashboard as “Cores”. In SolrCloud a Replica and a Core are the same thing.

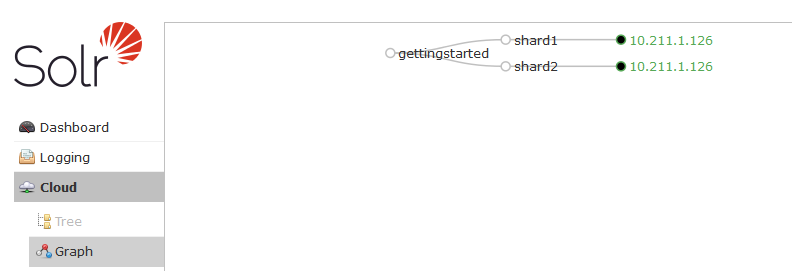
Above the picture shows the “gettingstarted” collection with two shards and a replication factor of one which results in two shards each with one core / replica. Since there are two shards, each with one core / replica, there are a total of two cores / replicas. That is why you see two “cores” in the Solr Dashboard.
It is interesting to see the state.json for the “gettingstarted” collection.
"gettingstarted": {
"maxShardsPerNode": "2",
"router": {
"name": "compositeId"
},
"replicationFactor": "1",
"autoAddReplicas": "false",
"shards": {
"shard1": {
"range": "80000000-ffffffff",
"state": "active",
"replicas": {
"core_node2": {
"state": "active",
"core": "gettingstarted_shard1_replica1",
"node_name": "10.211.1.126:8983_solr",
"base_url": "http://10.211.1.126:8983/solr",
"leader": "true"
}
}
},
"shard2": {
"range": "0-7fffffff",
"state": "active",
"replicas": {
"core_node1": {
"state": "active",
"core": "gettingstarted_shard2_replica1",
"node_name": "10.211.1.126:8983_solr",
"base_url": "http://10.211.1.126:8983/solr",
"leader": "true"
}
}
}
}
}
Below is a collection that has eight shards with a replication factor of three. What is the total number of cores / replicas? There are 24 cores / replicas.
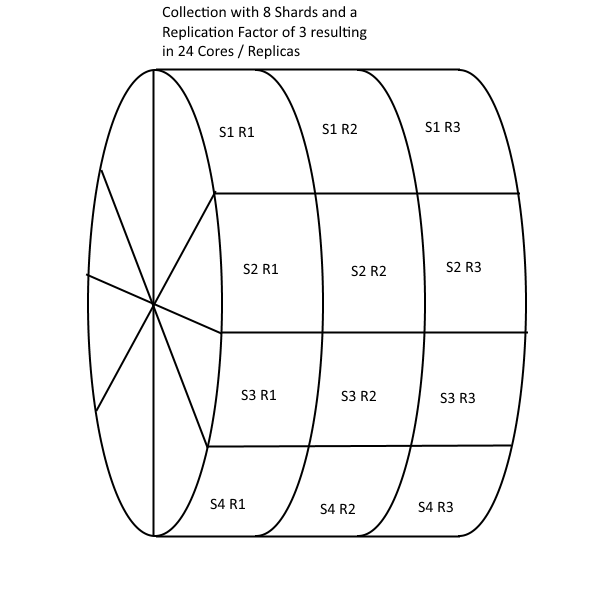
Just remember if you prefer to use the term Replica instead of the term Core that “replica 1” is just the first instantiation of a shard and “replica 2” is the second instantiation of the shard.
Starting Solr
Please be familiar with “Getting Started with SolrCloud”.
What I am about to describe are not steps to take Solr into production. I am not setting up linux users and permissions, this is just quick and dirty and I run as the root user doing it.
Download and untar/ unpackage Solr. Follow the steps found in the link above “Getting Started with SolrCloud” or just run this:
$ bin/solr -e cloud -noprompt
Point a webrowser to:
Zookeeper
If everything is running correctly then we are going to check and see what is in zookeeper. If it isn’t running, delete everything and start over. If you used the -noprompt command to start solr, follow the steps on the webpage and include the -V option with the command.
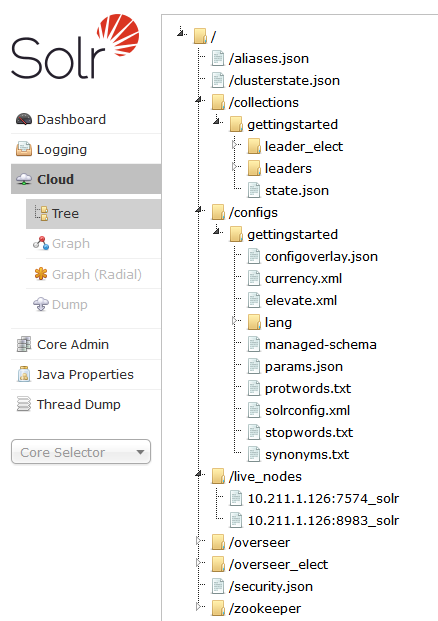
The first way to examine part of what is in zookeeper is through the Solr Dashboard.
Click on the left panel as shown here:
In Solr’s install directory, go to:
$ cd server/scripts/cloud-scripts
Run:
$ ./zkcli.sh -zkhost localhost:9983 -cmd list | less
You will see how the Solr Dashboard is showing what is in zookeeper.
Now download zookeeper and install it.
Got to the zookeeper bin directory and run:
$ ./zkCli.sh -server localHost:9983
Just because Solr is running the embedded zookeeper doesn’t mean you can’t connect to it.
Note that zkCli.sh is completely different than the shell found in Solr with the name zkcli.sh.
At the zk prompt to do following:
[zk: localHost:9983(CONNECTED) 1] ls /
You will see the following:
[configs, security.json, zookeeper, clusterstate.json, aliases.json, live_nodes, overseer, overseer_elect, collections]
You can examine the values, for example:
ls /live_nodes
[10.211.1.126:8983_solr, 10.211.1.126:7574_solr]
Why did I talk about zookeeper now? Because it is essential to understand where things are being stored and who retrieves the data.
Add a Node to the Cluster
Now, install Solr on another machine. Obviously it needs to be able to see the existing Solr machines on the network.
I decided to install Solr on a Windows machine since the currently running Solr is on a CentOS machine.
I started the Command Prompt by specifying “Run as Administrator”. At this time I am not looking for permission issues, I am avoiding them. I want to see Solr working.
From the DOS Command Prompt while in the Solr bin directory run:
solr.cmd start -c -z 10.211.1.126:9983
Obviously you use the I.P. address of your machine, not mine.
The -c means start in SolrCloud mode.
The -z specifies the zookeeper. Notice it is the embedded zookeeper already running in Solr.
Back to zookeeper, from the zookeeper command prompt (the real zookeeper, the capital C zookeeper, the zkCli.sh):
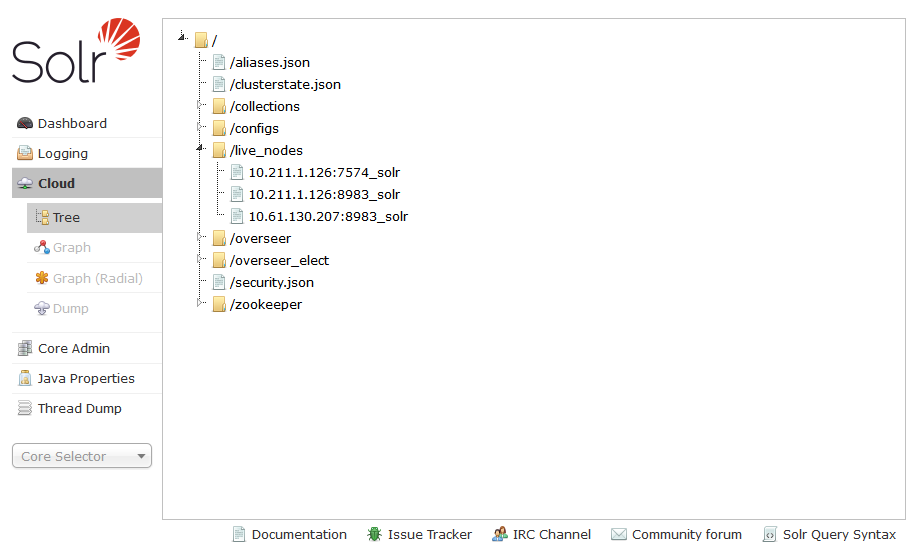
[zk: localHost:9983(CONNECTED) 3] ls /live_nodes
[10.61.130.207:8983_solr, 10.211.1.126:8983_solr, 10.211.1.126:7574_solr]
[zk: localHost:9983(CONNECTED) 4]
Notice that now there is a new entry in the live nodes.
You can also see this in the Solr Dashboard of the original Solr instance.
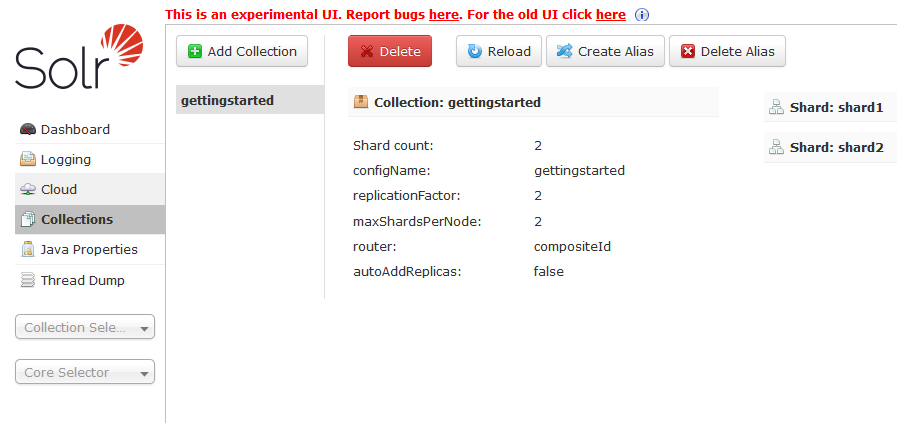
Now go to the Solr Dashboard of the original Solr instance, not the one you just started. Notice in the top right the link “Try New UI”.

You will see this:

Click on the “gettingst…” link in the middle pane.
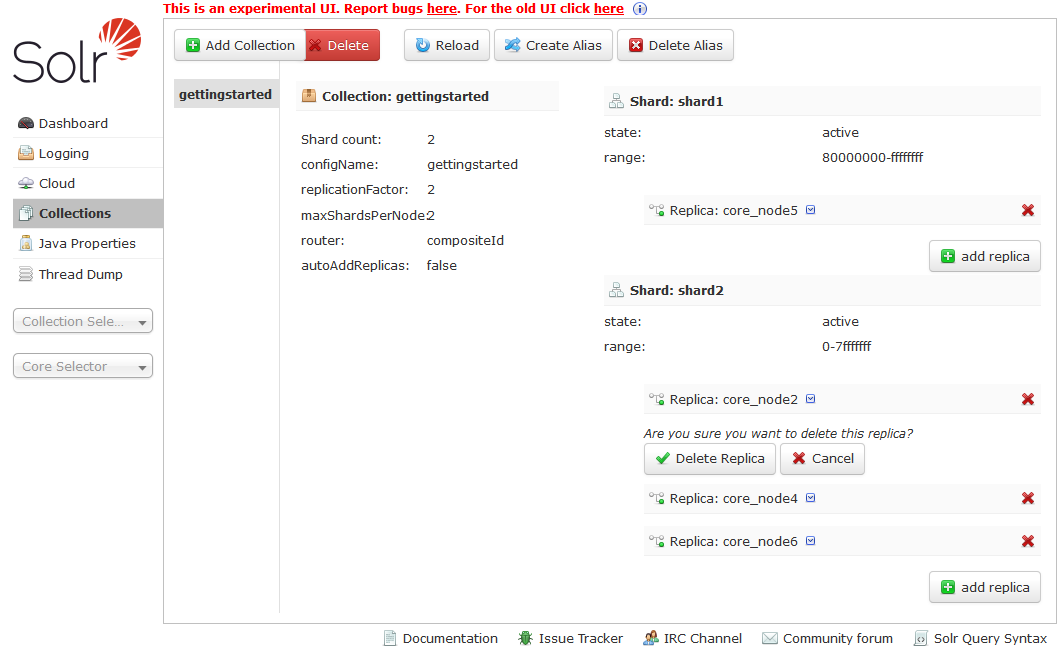
Now click on the Shards on the right of the middle panel.

Now click “add replica” on the right for shard1.
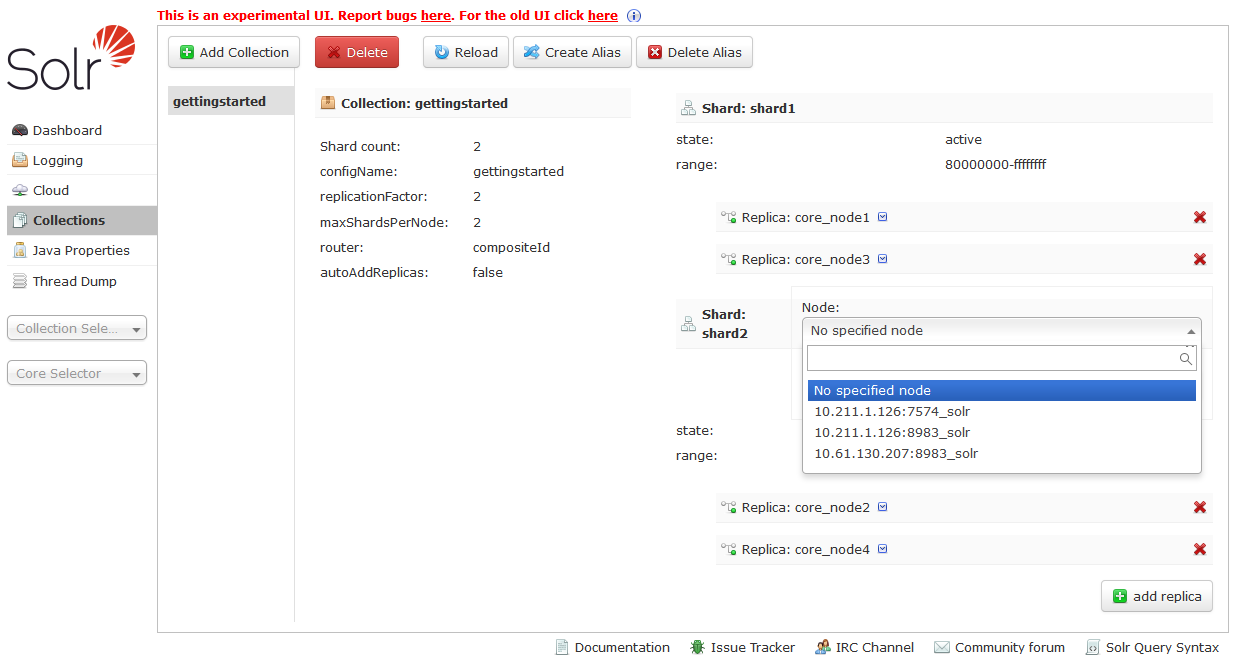
Select the ip address of the “new” instance, the one I started on the Windows machine is the last entry, and click “Create Replica”.

Now go to the Solr Dashboard of the new instance and go to the “Cloud” (click Cloud in the left panel).
Notice on the new instance that it is running and is hosting a Core / Replica of Shard 1.
What did these actions create on the new instance?
D:\solr-5.2.1\server\solr\gettingstarted_shard1_replica3
Inside of that new directory there is a core.properties file that contains this:
#Written by CorePropertiesLocator
#Wed Jan 27 17:40:26 UTC 2016
name=gettingstarted_shard1_replica3
shard=shard1
collection=gettingstarted
coreNodeName=core_node5
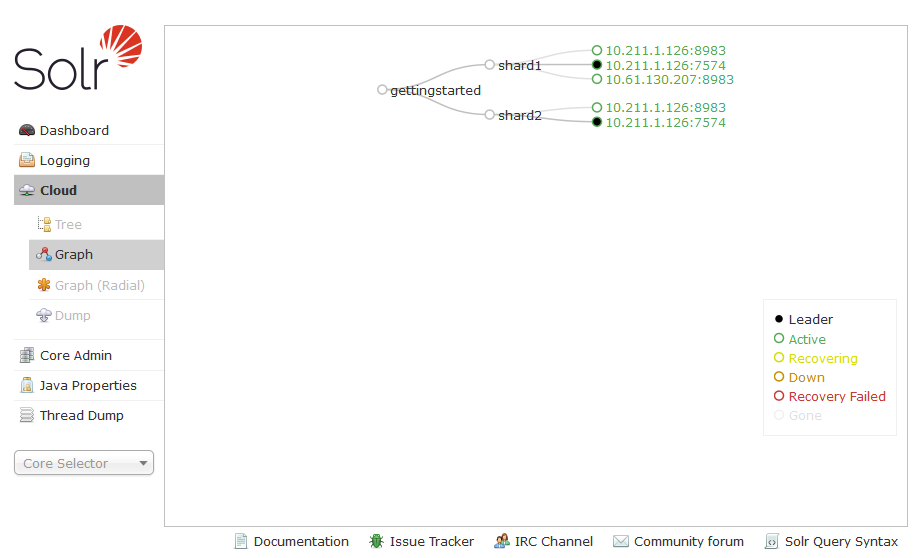
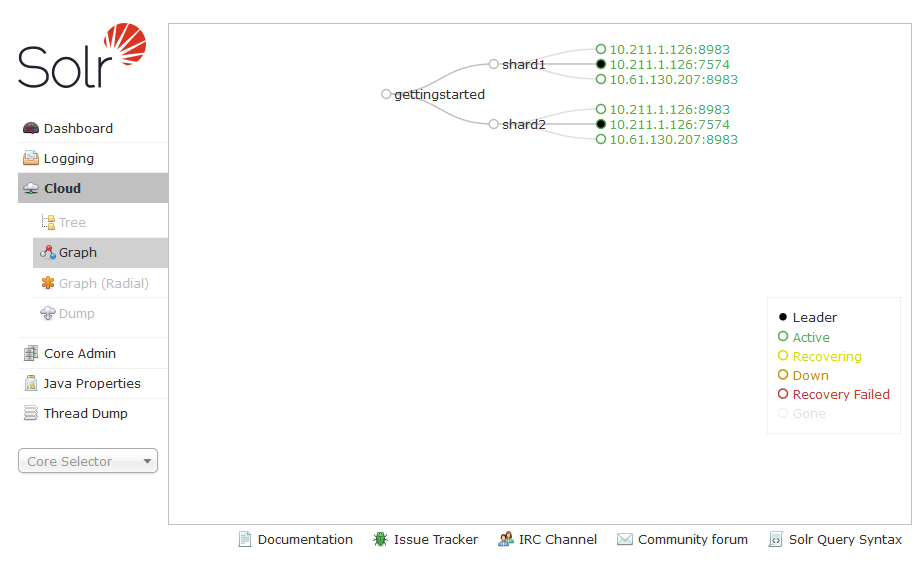
On the original instance of Solr add another replica / core for shard2 on the new Solr instance.
When finished the SolrCloud for the gettingstarted collection should look like this:
Adding Data
The Solr documentation instructs how to add data to the gettingstarted collection.
Before we add data we need to update the schema. The schema is stored in zookeeper and is called managed-schema. You can see it at this path in zkCli.sh (the real zookeeper shell):
[zk: localHost:9983(CONNECTED) 4] get /configs/gettingstarted/managed-schema
In the Solr install directory go to example/films and read README.txt. You will see that you need to update the Solr schema. You can run the following command or go into Solr and add fields through the Solr Dashboard.
curl http://localhost:8983/solr/films/schema -X POST -H 'Content-type:application/json' --data-binary '{
"add-field" : {
"name":"name",
"type":"text_general",
"stored":true
},
"add-field" : {
"name":"initial_release_date",
"type":"tdate",
"stored":true
}
}'
I updated the schema through the UI of the Solr Dashboard.

After updating the schema I reloaded the cores through the Solr Dashboard.
On the original (first) instance of Solr (in my case the instance running on CentOS) run the command:
bin/post -c gettingstarted example/films/films.json
Next go to the Solr Dashboard of the original instance, select the gettingstartedcollection and execute the default query.

It looks like the post put 1,100 records into the database.
NOTE:
If you don’t update the schema before running the post command you will call all kinds of exceptions and errors. I think this is because the post tries to auto-detect field types and update the schema at runtime and it erroneously picks the wrong field type.
Checking Replication
Now I am wondering did the replication to the second instance of Solr (for me the second instance was started on Windows) actually has the data. To check this I am going to remove the cores/replicas from my first instance of Solr (running on CentOS) by removing the cores / replicas through the Solr Dashboard.
Just click the red X next to each core / replica running on the first box.
Now go to the Cloud panel and see if the original box has been removed.
Everything looks as expected.
Now select the collection “gettingstarted” and execute the default query.

There are still 1,100 records. It looks like everything is working correctly.
Just to double check, go into the index directory and see if there are any files on the original instance.
$cd example/cloud/node1/solr/gettingstarted_shard1_replica2/data/index
There are no index files, just a write.lock file left there.
No comments:
Post a Comment